Hi everyone!
 |
| TTT |
This week's challenge:
Get out your Embellishments!
There's a Design Team Call at TTT!
The requirements are:
- Create one tip tutorial every 10-12 weeks.
- Produce a creation based on the current challenge every other week.
- Be able to post on your blog every week telling people about the current tip/challenge
In return you will get to work with a lovely bunch of ladies, be able to have some freebies from sponsors and learn loads from all the tips we get!!
If you are interested, please can you e-mail me at toptiptuesday@gmail.com with:
- a bit about yourself
- your blog details
- pictures of your favourite 3 creations
This DT call will remain open until the 1st January.
Merry Christmas!!
It's my turn at Top Tip Tuesday so check out my picture tutorial on
HOW TO MAKE APERTURE CARDS WITH PUNCHES! :)
First some basics... An aperture in a 5inch square card.
First some basics... An aperture in a 5inch square card.
You need a card blank and a punch. I've used 4cm square punch.
Place your card blank and a punch as in the photo and punch.
Remember to double check if your punching the front or the back of a card! Below is what you should have.
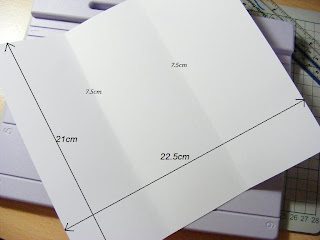
Next I'll show you how to make 3 apertures in a slimline card. I've used a card blank measuring 21x22.5cm, scored as in the photo @ 7.5cm and again @ 7.5cm from each side). You also need 2.5cm square punch.
Next you need to fold the card starting from the left. Fold it once and place the punch as in the photo.
Punch and place the punch as in the photo.
Punch again and place as in the photo.
That is what you should get. Now you can use some acetate, stick it to the card blank with double sided tape.
Next put some 3D foam double sided tape as in the photo.
Add some punched out shapes or some glitter.
Fold the card and voila! Job done! :)
A sample of what you can make once you have an aperture card ready.
And another one!
This one is made in a similar way to the first square card. The only thing you do is punch once close to the left and then punch second time moving the punch to the right.
With this card I'd like to enter the following challenges:
Anything Goes @
Anything Goes @
Christmas Card @
Christmas @
Christmas @
Let's get Square @
Christmas @
Anything Goes @


12 comments:
Great tutorial - thanks for sharing. Elizabeth x
Hi there
I am thrilled you have joined in my "Free and Easy" theme at Allsorts this fortnight and confess to being astounded by the huge response .
I usually like to visit every entry and say a few words about their creations, but the sheer volume so far along with the Christmas preparations we all have to juggle means this is a "copied and pasted" message, for which I apologise.
Wishing you a very Happy Christmas and wonderful holiday time
B x
Have you entered my candy
Great tutorial Maggie!! Thanks for sharing with us at Penny's. Good Luck and Merry Christmas!
Courtney~
Your tutorial is just fab sweetie! Wanted to pop in and tell you I enjoyed your directions and examples.
Hope you have a very Merry and Blessed holiday
very nice card ! thank you for joining us on our challenge's blog. Good luck !
Lovely bright and cheerful Christmas card.Great tutorial too.Thanks for joining us at Craft Your Passion :D
Lisa x
These are all lovely!
Thanks so much for sharing such a fun tutorial and for joining us at IDIC this week
xx
Wow, these are amazing!
★ Jasmine Wilmany
http://www.jasminewilmany.com
Thanks for joining us at IDIC this week and sharing your great creations. Sorry this is the same message I am leaving on all entries now as I am running out of time so close to Christmas! Merry Christmas.
Wonderful cards :)
Thank you for joining us at IDIC.
Hugs Gurkiss
http://gurkiss.com/scrapbooking
great tut and wonderful card, thanks for joining crafty catz
A fantastic project. Thanks for joining us at Crafty Catz this week x
Post a Comment
Thank you for your comment! Each and every one makes me smile! :) Maggie x